I’ve unboxed six new sets of irons over the last decade, and every one arrived with a shiny manufacturer sticker wrapped around the shaft just above the hosel. My last set – a set of Ping i230s I picked up this spring – sat in the corner of my garage for two weeks because I wasn’t sure if pulling that sticker off would scratch the finish or void something I didn’t know about. It won’t. Here’s exactly what’s safe on steel and graphite shafts, what that sticker actually tells you before you toss it, and the three mistakes that leave a shaft looking worse than when you started.
Quick Answer: Yes — most golfers remove the shaft sticker, and there’s no rule or warranty clause that says you can’t. Goo Gone or a hair dryer on low heat gets it off in under two minutes on a steel shaft. Graphite shafts need a gentler touch: skip the heat gun and stick to adhesive remover instead.
Should You Remove the Shaft Sticker at All?
Short answer: yes, go ahead. Nothing in a manufacturer’s warranty terms requires the shaft sticker to stay in place, and I checked the published warranty pages for Callaway, TaylorMade, and Titleist before writing this — none of them mention shaft stickers at all. Warranty claims track back to your receipt or product registration, not a decal.
Resale is the other worry golfers bring up, and it’s mostly overblown. Used-club retailers grade clubs on head condition, shaft condition, and grip wear, not on whether a manufacturer’s sticker survived. A clean shaft with no leftover glue actually photographs better for a listing than one with a half-peeled label curling off the edge. This applies whether you’re running a set of forged blades or a set of budget-friendly iron sets you picked up to get started — the sticker question doesn’t change with the price tag.
There’s one exception worth a phone call. If you bought through a custom fitting and there’s any chance you’ll exchange or return the irons, check with the shop first. Some fitters get stricter about accepting returns once you’ve altered a shaft’s original finish, even when the written policy doesn’t spell that out. That’s a five-minute call that saves you a headache later.
What’s Actually Printed on That Sticker (Before You Peel It Off)
Look closely before you start scraping. Most shaft stickers aren’t just branding — they’re a spec label. On steel-shafted irons, you’ll typically find the flex code (R, S, X, A, or L), often the shaft model name, and on some brands a swing-weight or build-date code used for quality control on the assembly line.
That information is more useful than it looks. If you ever need to order a single replacement iron, get a shaft reshafted, or tell a fitter exactly what you’re currently gaming, that sticker saves you from guessing. I photograph every shaft sticker before I remove one — it takes ten seconds, and I’ve used those photos twice to confirm exact shaft specs for a buddy shopping for a used set of the same irons.
None of this means you need to keep the sticker forever. Photograph it, peel it, move on. You just don’t want to lose information that’s a lot harder to track down once it’s in the trash.
Steel or Graphite? Check Your Shaft Before You Reach for Heat
This is the step every other guide skips, and it’s the one that actually matters. Heat is the fastest way to loosen sticker adhesive, but how much heat your shaft can safely take depends entirely on what it’s made of.
Steel shafts
Almost every set of irons ships with steel — True Temper, KBS, Nippon, and similar brands all handle direct heat from a hair dryer or heat gun without real risk. The steel won’t warp from a hair dryer’s output, and the chrome plating tolerates the temperatures involved in sticker removal without discoloring.
Graphite shafts
Graphite is a different story. The shaft is a resin-and-fiber composite, and epoxy bonds the clubhead to it at the hosel. Concentrated heat — especially from a heat gun held too close for too long — can soften that bond before you’d ever see visible damage to the shaft’s finish.
Golfers on the Golf Monthly forum have flagged this exact issue: heat is fine on steel, but risky on graphite once you get anywhere near the hosel. If your irons have graphite shafts, skip the heat gun entirely and use an adhesive remover instead — it does the same job without the risk.
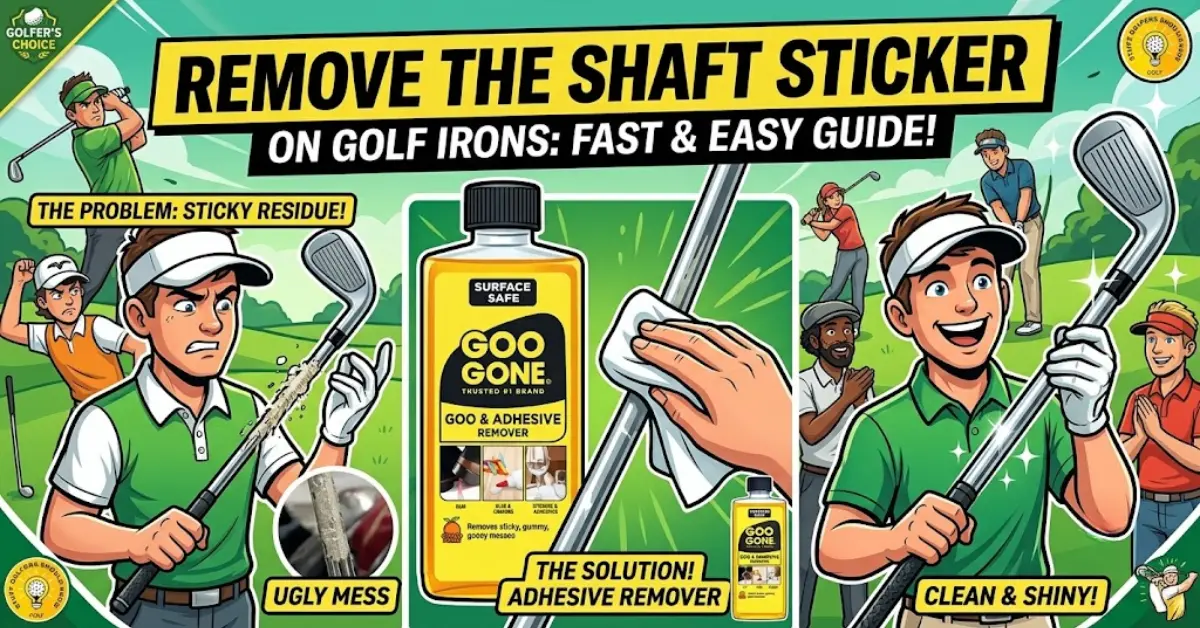
5 Ways to Remove a Shaft Sticker (Cost, Time, and Risk Compared)
Every competitor mentions two or three of these in passing. None of them put real numbers next to them, and none flag which methods are safe on graphite. Here’s the full picture, priced as of mid-2026.
| Method | Cost (USD) | Time | Graphite-Safe? | Best For |
|---|---|---|---|---|
| Goo Gone (Original, 8 oz) | ~$6–7 | 1–2 min | Yes | Fastest overall — my default |
| WD-40 (8 oz) | ~$7–8 | 2–3 min | Yes | Already in most garages |
| Rubbing alcohol (70% isopropyl) | ~$2–3 | 2–3 min | Yes | Cheapest, evaporates with no residue |
| Hair dryer + plastic scraper | Free (if you own one) | 3–5 min | Steel only | No products to buy |
| Cooking oil (soak) | Free (pantry) | 1–2 hrs | Yes | No rush, no shopping trip |
Goo Gone is the best all-around option here, and it’s not close — nothing else combines the speed, the graphite-safe formula, and the price. WD-40 is a fine substitute if it’s already sitting on your workbench, and rubbing alcohol is the move if you’d rather not buy anything you won’t use again. Skip the heat gun on graphite, and skip nail polish remover entirely — more on why in the mistakes section below.
Step-by-Step: How to Remove a Shaft Sticker Cleanly
- Peel what lifts easily. Start at a corner with your fingernail and peel back slowly. Most of the sticker’s face comes away in one piece — don’t force it if it starts tearing into small strips.
- Loosen the rest (steel shafts only). Run a hair dryer on low heat about 3 inches from the surface for 20–30 seconds. Graphite shafts should skip straight to step 3.
- Apply your remover. Put a dime-sized amount of Goo Gone, WD-40, or rubbing alcohol on a soft cloth — not directly on the shaft — and rub over the remaining sticker and glue in small circles.
- Wipe and repeat if needed. The adhesive should lift within a minute. If residue remains, apply a second, smaller amount and let it sit for 60 seconds before wiping again.
- Wash the area. Clean with mild dish soap and warm water, then dry immediately with a clean towel. Don’t let moisture sit near the hosel.
- Inspect and polish (optional). Check the shaft in good light for any leftover tackiness. A dry microfiber cloth with a drop of chrome polish brings the shine back if the area looks dull.
That’s the exact process I used on the i230s — six minutes total, including the walk out to the garage to grab the Goo Gone. Once the shaft’s clean, our guide to hitting your irons consistently is the next stop before your first round with them.
3 Mistakes That Damage the Shaft Finish
- Razor blades and box cutters. Scraping with a metal blade looks satisfying, but it’s the fastest way to put a permanent scratch through the shaft’s clear coat or paint fill. Use a plastic scraper or an old gift card instead — it’s soft enough not to bite into the finish.
- Nail polish remover or acetone. Acetone strips more than adhesive. On painted or clear-coated shafts, it can dull the finish or pull paint fill straight out of the engraved lettering. Goo Gone and WD-40 do the same job without that risk.
- A heat gun held too close, too long, near the hosel. Covered above, but worth repeating on its own: this is the one mistake on this list that can cause structural damage instead of just cosmetic damage, and it’s specific to graphite shafts.
Frequently Asked Questions
Can you use Goo Gone on golf clubs?
Yes. Goo Gone’s own product guidance lists metal as a safe surface, and it’s the product I reach for first. Apply it to a cloth rather than directly on the shaft, and avoid extended contact with rubber grips — Goo Gone can break rubber down over time.
Can you use alcohol to clean golf clubs?
Yes. Rubbing alcohol works well and evaporates without leaving residue, which is why some golfers prefer it to Goo Gone. Stick to a 70% isopropyl solution and apply it with a cloth rather than pouring it directly onto the shaft.
How do you get stickers off golf irons?
Peel off what comes away easily by hand, then use heat (steel shafts only) or an adhesive remover like Goo Gone, WD-40, or rubbing alcohol to loosen what’s left. Wipe clean with a soft cloth, then wash the area with mild soap and water.
Will removing the shaft sticker void my warranty?
No. No major iron manufacturer ties its warranty coverage to the shaft sticker remaining in place. Your proof of purchase or product registration is what matters, not the branding on the shaft.
Does a heat gun damage graphite shafts?
It can, if you hold it too close to the hosel for too long. The concern isn’t the graphite fiber itself — it’s the epoxy bond holding the clubhead on, which can soften under concentrated heat before any damage is visible. Use an adhesive remover on graphite shafts instead.
Bottom Line
Removing the shaft sticker on a new set of irons takes less time than reading this article, as long as you match the method to your shaft. Steel gives you room to use heat; graphite doesn’t, and Goo Gone handles both without the risk either way. Photograph the sticker first, use a plastic scraper instead of a blade, and you’ll have a clean shaft in under five minutes.
Now that your irons are ready to play, dial in your distances before your next round with our golf club distance chart — it breaks down real yardages by handicap so you know exactly what each new club in the bag is good for.