If you are tired of watching your tee shots slice into the trees while your playing partners split the fairway, this is the guide you have been looking for. Learning how to hit driver straight comes down to one thing most amateur golfers never fix — the separation between your upper and lower body in the downswing.
That aggressive urge to throw your shoulders at the ball ruins everything. Your upper body races your lower body, your swing path goes over the top, and the ball curves right every single time.
This three-part framework fixes that exact problem. You will learn the hip-high slot position every tour player finds, the dual-move separation sequence that drops the club on the correct path, and a simple lead eye drill that stops your upper body taking over. It works for your driver and your irons. Work through it step by step and stop slicing for good.
The Separation Engine
How to Set Up Correctly Before You Hit Driver Straight
Everything in your downswing is decided before you even swing the club. If your grip and setup are wrong, no downswing fix will save you. Get these four fundamentals right every time you stand on the tee.
Grip Pressure Hold the club like you are holding a tube of toothpaste without squeezing any out. Tight hands lock your forearms, kill your swing speed, and make it almost impossible to square the clubface at impact. Most golfers grip the driver far too hard when they are nervous on the tee — this is exactly when you need to relax your hands most.
Grip Position For a neutral grip, the V shape formed by your thumb and index finger on your lead hand should point toward your trail shoulder. If both Vs point outside your trail shoulder, your grip is too strong and you risk hitting a hook. If they point at your chin, your grip is too weak and a slice becomes almost inevitable.
Stance Width Your driver stance should be wider than your shoulder width. Drop your feet slightly outside your shoulders to create a stable base. A narrow stance causes your body to sway rather than rotate, which destroys the separation sequence you are about to learn.
Ball Position Play the ball off the inside of your lead heel — further forward than any other club in your bag. This forward position allows you to catch the ball on the upswing, which reduces backspin and increases your carry distance. If the ball is too far back in your stance, you will hit down on it and produce a low slice with zero carry.
Tee Height Tee the ball so that the top half of the driver head sits below the equator of the ball at address. Too low and you hit down. Too high and you catch the crown of the clubface and pop the ball straight up.
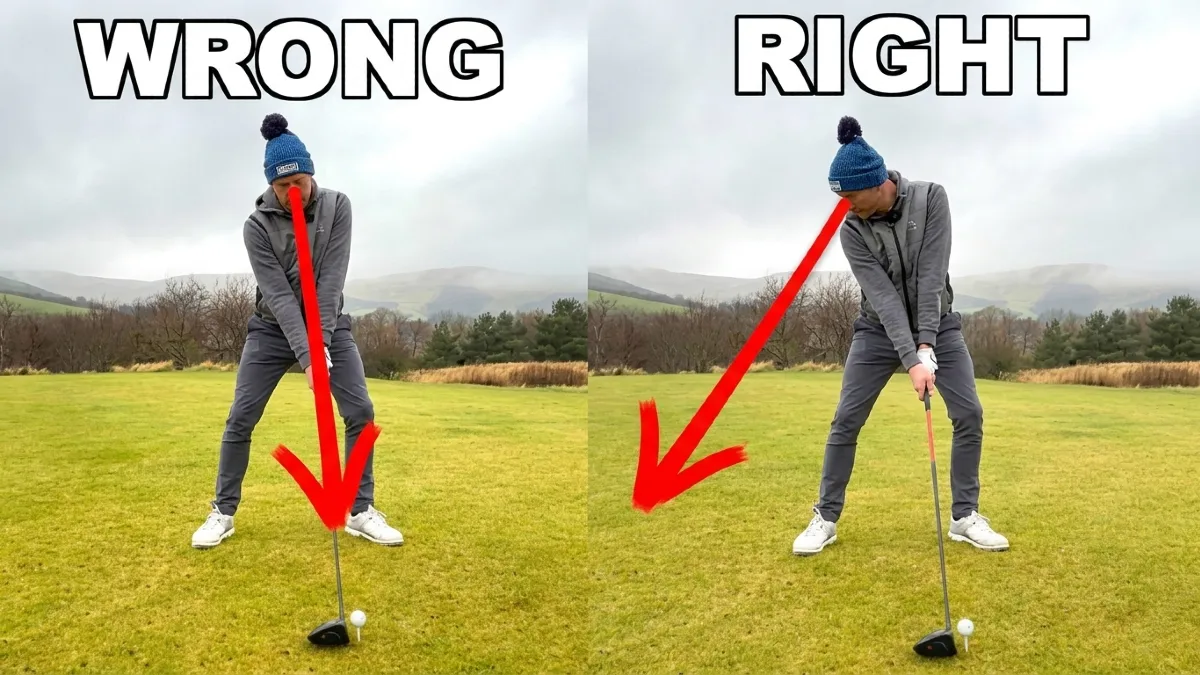
How to Hit Driver Straight: Finding the Hip-High Slot Position

Let’s look at the perfect golf downswing sequence. You need to drop the club into the right slot. Think about the moment your hands reach hip height on the way down. The club shaft must align with your trail forearm. It can also sit slightly above it.
Most amateur golfers miss this spot entirely. They hit two major danger zones. First, they let the shaft cross their lead forearm. This cuts across the neck line and causes a nasty slice. Second, they drop the club way below the trail forearm. This leads to heavy blocks or duck hooks.
Every single player on the PGA Tour hits this specific tolerance zone. They might have weird backswings or strange grips. But they all find this exact spot when their hands drop to their hips. This position dictates your clubface control and your overall swing path. Finding this slot is the first step to hitting better golf shots.
A simple way to check this position is to film yourself from face-on at the range. Pause the video when your hands reach hip height. The club shaft should point directly at or just above your trail forearm. If it points above your lead arm, you are coming over the top. If it drops way below your trail arm, you will block or hook. Every rep at the driving range should end with you checking this one frame.
The Separation Move: How to Hit Driver Straight With Your Body, Not Your Hands
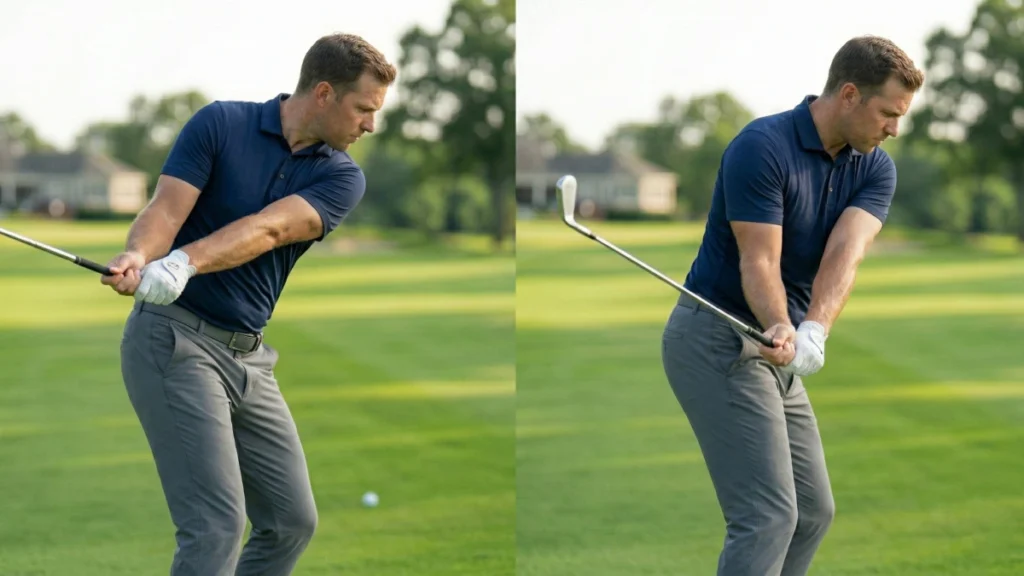
You know where the club needs to go. Now you need to learn the core mechanic to get it there. You must separate your upper and lower body. The transition relies on two specific moves. They must happen at the exact same time as one single motion.
Move number one involves your lower body. Your belt buckle must slide and rotate ahead of the golf ball. Move number two involves your upper body. Your chest must remain pointing completely behind the golf ball.
This dual action works like magic. If your hips go forward and your chest stays back, the club has no choice. It naturally drops right onto your trail forearm.
You do not need to manipulate your hands at all. In fact, your hands only physically drop about 10 inches down from the top of the swing. Your body rotation does the rest of the work. This simple combination prevents the upper body from spinning out. It guarantees a straight golf drive and completely eliminates the risk of coming over the top.
The feeling you are after: Think of your lower body as a door swinging open while your upper body stays against the wall. Your hips open to the target while your chest points back at the ball. This is not a slow or gentle movement — it should feel athletic and powerful. The separation creates the lag automatically. You do not have to hold it or manufacture it with your hands.
Most amateur golfers do the opposite. They use their hands to try to create power, which fires the shoulders first and sends the club path outside the ball. The result is a pull or a slice on almost every driver shot.
The Lead Eye Drill: The Fastest Way to Stop Slicing the Driver
Golf is a very hard game. Human nature and your natural urge to hit hard will try to ruin this sequence. Your brain wants to throw your shoulders at the target. You need a physical constraint to fix this flaw.
You can use the lead eye drill as a built in fail safe. Take your normal setup over the golf ball. Now, physically point your head slightly behind the ball. You want to look at the back of the golf ball using only your lead eye. For a right handed golfer, this is your left eye.
Keep your head tilted back and maintain that focus as you swing down. This simple trick alters your spinal tilt during the dynamic movement. It acts as an anchor. The momentum of the swing wants to pull you forward.
Looking with your lead eye forces your shoulders to stay closed while your hips fire open. This single drill is the secret to help you stop slicing the driver. Practice this feeling at half speed to see quick results.
At the range, do this: Start with a 7 iron at 50 percent swing speed. Set your head position behind the ball and find the back of the ball with your lead eye before you swing. Hit 10 balls this way. You will immediately feel your shoulders staying closed longer while your hips clear through. Once this feels natural with the 7 iron, move up to a 5 iron, then a hybrid, then the driver. Do not rush straight to the big club. The feeling must be grooved with a shorter club first or your old habits will take over under the pressure of swinging the driver.
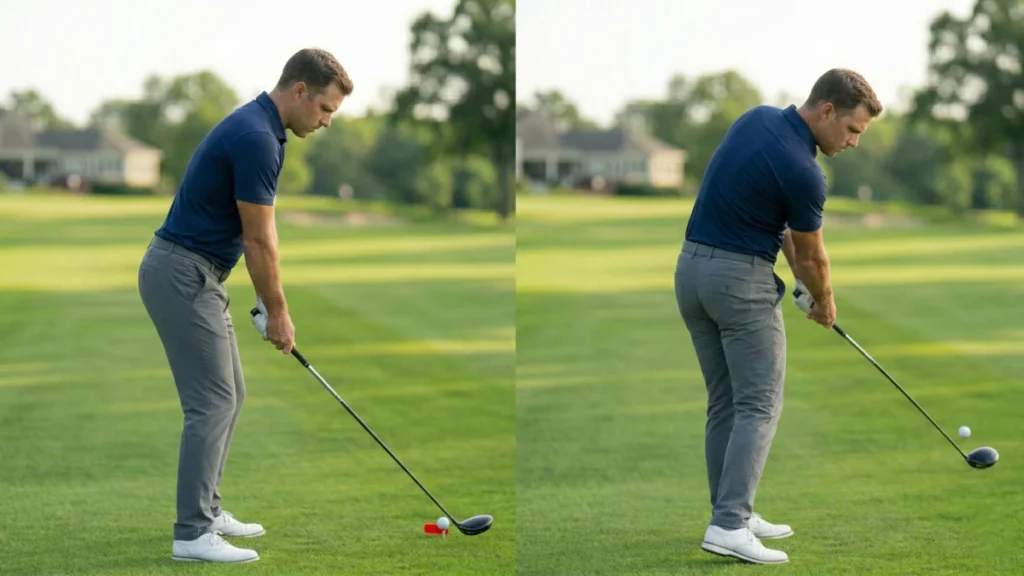
Driver vs Irons: Why Your Setup Must Be Different to Hit Driver Straight
The driver requires a completely different setup than your irons. You play an iron shot near the middle of your stance. You play a driver way forward in your stance. This helps create an upward angle of attack.
Because the ball is so far forward, you cannot center your belt buckle to the ball. You must center your body behind the clubhead instead.
The Secondary Target
Different Setup
Unlike irons, you play a driver way forward in your stance to help create an upward angle of attack.
Shift Your Center
Because the ball is so far forward, you cannot center to it. You must center your body behind the clubhead instead.
The Tee Trick
Place a standard golf tee in the ground just behind the driver head to act as your new visual reference point.
Aggressive Execution
Slide your belt buckle ahead of the tee, but keep your chest pointing behind it for a powerful, straight launch.
Once you place the reference tee behind your driver head, your entire mental focus shifts. You are no longer trying to hit a golf ball sitting 5 inches ahead of your center. You are swinging through a point directly beneath your sternum. This makes the separation sequence far easier to execute because your reference point matches your body’s natural rotation center.
Practice this tee drill for a full range session before removing the reference tee. After 50 to 60 swings, your body will find the position automatically without needing the visual aid.
There is a very simple trick to fix your alignment. Place a standard golf tee in the ground just behind the driver head. This tee acts as your new visual reference point.
Now, execute the exact same swing sequence. Slide your belt buckle ahead of the tee. Keep your chest pointing behind the tee. The actual golf ball does not matter for your body alignment. Once you master this specific setup, you can swing freely and aggressively. Knowing how to hit driver straight comes down to referencing this secondary target.
Common Mistakes That Stop Golfers Hitting Driver Straight
Even with the right framework, most golfers fall into the same three traps. Check yourself against this list before your next round.
Mistake 1: Firing the right shoulder at the ball This is the number one cause of slicing. The moment your right shoulder (for right-handed golfers) starts leading the downswing, the club path moves outside the target line and the face stays open. The lead eye drill in this guide is specifically designed to prevent this. If you are still slicing after practicing the separation move, this is almost certainly what is happening.
Mistake 2: Gripping the club tighter under pressure Tension travels from your hands through your forearms and into your shoulders. Tight shoulders cannot stay back during the downswing — they fire immediately. Before every driver shot on the course, consciously loosen your grip pressure three times before you start your takeaway.
Mistake 3: Swinging too hard The harder most golfers try to swing, the shorter and more crooked the ball goes. Maximum distance with a driver comes from maximum clubhead speed at the bottom of the arc — not from muscling the club. A smooth, controlled swing where you feel the weight of the clubhead throughout the swing will consistently out-perform a violent lunge at the ball. Swing at 80 percent effort and watch your drives fly further and straighter.
Frequently Asked Questions: How to Hit Driver Straight
A correct grip alone does not guarantee a straight drive. Slicing happens when the clubface is open relative to your swing path at impact — and that is usually caused by the upper body leading the downswing, not the grip. Check your separation move first. If your shoulders are firing before your hips have cleared, the club will travel across the ball from outside to inside and produce a slice regardless of how good your grip looks at address.
Position the ball off the inside of your lead heel. This is further forward than any other club you hit. The forward position allows the club to travel slightly upward at impact, which is the angle of attack you need to reduce backspin and maximize carry distance. If you are hitting down on your driver, moving the ball forward in your stance is the single fastest fix.
Tee the ball so roughly half the ball sits above the crown of the driver at address. This promotes an upward strike and helps you find the upper-center of the clubface, which is the highest-smash-factor zone on a modern driver head. Teeing too low forces a downward attack angle and dramatically reduces carry distance while increasing sidespin.
Coming over the top means your shoulders are initiating the downswing before your lower body has started its slide and rotation. The fix is the separation drill in this guide — your belt buckle must move first. A useful range drill: place an alignment stick in the ground just outside your lead foot. If your driver grip end points toward the stick on the way down, you are over the top. Groove the feeling of the grip dropping toward your trail hip instead.
The separation move, the lead eye drill, and the hip-slide rotation are all identical between driver and irons. What changes is the setup — ball position, stance width, and spine tilt are all adjusted for the driver. The downswing sequence itself does not change. This is exactly why practicing the drill with a 7 iron first is so effective — you groove the correct movement with a forgiving club before taking it to the tee.
Your Step-by-Step Plan to Hit Driver Straight Starting Today
You now have everything you need. Work through this in order and do not skip ahead.
Start at the setup. Check your grip pressure, your ball position, and your tee height before you change anything about your swing. Most golfers fix 30 percent of their slice just by correcting these three fundamentals.
Then move to the separation sequence. Head to the range with a 7 iron. Use the lead eye drill at 50 percent speed for 10 to 15 balls. Feel your hips clearing while your chest stays back. When you can do this consistently with a short iron, step up to a mid iron, then a hybrid.
Only then pull out the driver. Place your reference tee behind the driver head and practice the belt buckle slide with your chest staying behind the tee. Film yourself from face on. Check the hip-high downswing position in the video. Adjust and repeat.
Give this three range sessions before you judge the results. Real swing changes take repetition, not just one bucket of balls. But if you commit to the sequence in this guide, you will find the fairway far more often than you ever did before.
Want to take your ball striking further? Read our full guide to fixing your slice driver at Madknows, or explore our best golf drills for the driving range to build on everything you have learned here.