I learned the anhyzer the hard way – shanking disc after disc into the woods trying to force a shot I’d seen the pros throw. My rating was stuck around 880 because I couldn’t shape right-turning lines without switching to a forehand vs backhand, which I never trusted. Then I spent a full season grinding anhyzers with a beat-up DX Roc, and something finally clicked. This guide is everything I wish someone had told me before I wasted 50 rounds throwing “annies” that faded out after 100 feet.
Quick Answer: To throw an anhyzer shot, tilt the outer edge of the disc upward and the inner edge downward toward your body. Release with a smooth, controlled motion while keeping your wrist stable and your body slightly leaned back. For right-handed backhand players, this makes the disc turn right out of your hand. Start with understable putters or mids before moving to drivers.
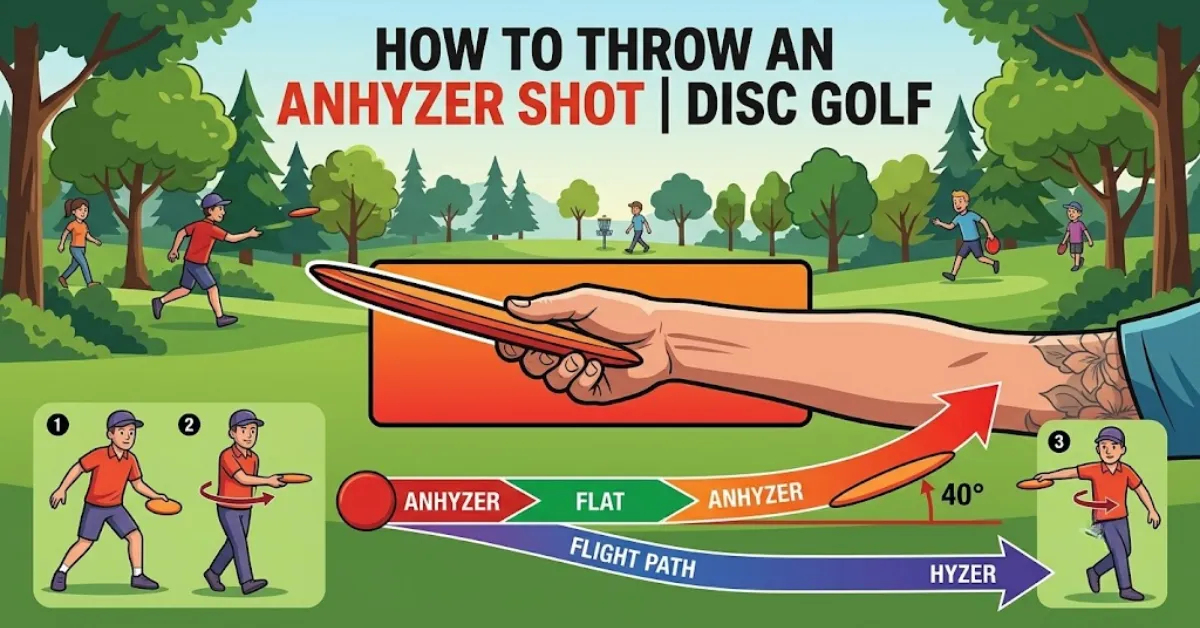
What Is an Anhyzer Shot – and Why Do You Need It?
An anhyzer shot — often called an “anny” — is a disc golf release angle where the outer edge of the disc is tilted upward and the inner edge (closest to your body) is tilted downward. For a right-handed backhand (RHBH) thrower, this angle forces the disc to turn right immediately out of your hand, instead of its natural leftward fade.
Why does this matter? Because not every fairway goes left. Wooded courses, dogleg rights, and obstructed greens often demand a right-turning line. If you only throw hyzers (which finish left for RHBH players), you’re leaving strokes on the course every time the basket sits on the right side of the fairway.
The anhyzer gives you options. It lets you shape shots around obstacles, attack pins from angles your forehand can’t reach, and add versatility to your game without learning a completely different throwing motion.
Anhyzer vs Hyzer vs Flat: The Three Release Angles Compared
Before we dive into mechanics, let’s get the terminology straight. These three release angles are the foundation of every shot you’ll throw.
The hyzer is your bread-and-butter shot — reliable, predictable, and easy to control. The flat release is the hardest to master because any slight angle mistake gets magnified. The anhyzer sits in the middle of the difficulty scale: harder than a hyzer but easier than a perfect flat release. Once you’ve got it, you’ll wonder how you ever played without it.
For a deeper dive into hyzer shots, check out our hyzer shot guide.
The 5-Step Anhyzer Throwing Mechanics
Here’s where we get into the real stuff. Most guides give you three bullet points and call it a day. These five steps are what actually got me throwing anhyzers that held the line instead of fading out after 150 feet.
Step 1: Grip the Disc with the Top Angled Toward You
Start with your normal power grip or fan grip. The only difference? Rotate your wrist so the top of the disc angles toward your body. Think of it like you’re trying to show the stamp to your chest.
For a RHBH player, this means the outside edge (the part of the disc farthest from your body) is now higher than the inside edge. That’s your anhyzer angle already set in the grip.
Pro tip: Don’t over-grip. Squeezing too hard locks up your wrist and kills the angle. Hold it firm but relaxed — like you’re shaking hands with the disc.
Step 2: Set Your Wrist Angle and Hold It
The wrist is where most players mess up. You want a stable wrist that holds the anhyzer angle throughout the throw — not a wrist that starts on anhyzer and then flattens out mid-pull.
One mental trick that worked for me: imagine you’re turning a doorknob to the right. That slight rotation of your forearm and wrist is the exact motion that sets and holds the anhyzer angle. The further you tip the wing of the disc up, the more aggressively it will turn right.
Don’t try to force the angle at the last second by twisting your wrist during the release. That’s a recipe for inconsistency. Set the angle in your grip and wrist before you start your pull, and keep it there.
Step 3: Lean Your Upper Body Slightly Back
This is the secret that nobody tells you. To throw an effective anhyzer, you need to lean your upper body slightly away from the target — toward your throwing side.
For a RHBH player, that means leaning back and to the right. This does two things:
- It naturally puts your arm on a lower plane, which matches the anhyzer angle
- It gives the disc room to turn right without your body blocking the line
How much lean? Start with just a few degrees — think of it as tilting your shoulders so your throwing shoulder is slightly lower than your non-throwing shoulder. Too much lean and you’ll lose power. Too little and the disc won’t turn.
Step 4: Pull Through on a Slightly Lower Plane
Here’s where the rubber meets the road. Unlike a hyzer throw where your pull-through is higher, an anhyzer requires a slightly lower pull-through.
Your arm should come across your body at about chest height or slightly below. The disc should feel like it’s traveling on a downward angle from your reach-back to your release point.
Critical detail: Keep the nose of the disc down. A nose-up anhyzer will stall, lose speed, and fade out early — which is exactly what you don’t want. Imagine you’re throwing the disc into the ground about 50 feet in front of you. That mental image usually fixes the nose angle.
Step 5: Follow Through Low and Across
Your follow-through determines where the disc actually goes. For an anhyzer, finish low and across your body.
Think of it as drawing a straight line through the disc’s angle all the way to the end of your motion. If your follow-through goes high, the disc will pop up and stall. If it goes too far left, you’ll pull the shot off-line.
My personal checkpoint: I always aim to finish with my throwing hand pointing at the spot where I want the disc to land. If I’m throwing a right-turning anhyzer, my hand finishes pointing to the right of the fairway. That simple visual cue fixed more of my anhyzers than any mechanical tweak.
Choosing the Right Disc for Your Anhyzer Shot
Not all discs are created equal when it comes to anhyzers. The disc you choose determines whether your anhyzer holds the line, turns into a roller, or fights back too early.
Understable Discs: Your Anhyzer Best Friend
Understable discs naturally want to turn right (for RHBH players). That makes them the easiest choice for learning anhyzer and for throwing shots that hold the turn for the entire flight.
Look for flight numbers with high turn: -2, -3, or even -4 turn ratings. Some of my favorites for learning:
- Innova Leopard3 (6, 5, -2, 1) — fairway driver that’s forgiving and easy to control
- Innova Sidewinder (9, 5, -3, 1) — distance driver that holds long anhyzer lines
- Discraft Buzzz (5, 4, -1, 1) — midrange that’s perfect for practice
- Innova Mako3 (5, 5, 0, 0) — neutral mid that gives clear feedback on your angle
Overstable Discs: The Flex Shot Specialists
Overstable discs resist turning. That sounds counterintuitive for an anhyzer, but that’s exactly what makes them great for flex shots — shots where the disc turns right on an anhyzer line and then “flexes” back left as its stability kicks in.
The flex shot adds distance and creates dramatic S-curves. You throw an overstable disc on an anhyzer angle, it turns right, and then fights back to the left at the end. The result? A shot that covers more lateral ground than anything else in your bag.
Look for flight numbers with high fade: 2, 3, or 4 fade ratings. Overstable drivers like the Innova Destroyer or Discraft Force are classic flex shot discs.
Which One Should You Start With?
Start with understable putters and midranges. They’re slower, more forgiving, and give you instant feedback on your angle. Once you can consistently throw a 200-foot anhyzer with a putter or mid, graduate to fairway drivers. Save the overstable flex shots for after you’ve mastered the basic anhyzer.
For more on disc stability and flight numbers, check out our complete guide to disc golf discs.
5 Common Anhyzer Mistakes (And How to Fix Them)
I made every single one of these mistakes. Here’s how to fix them before they become bad habits.
Mistake 1: The Disc Fades Out Too Early
The problem: You throw an anhyzer, but it fights back to the left after only 100-150 feet. The shot looks like a weak hyzer instead of a proper anny.
The fix: This is almost always a nose-angle problem. You’re releasing the disc nose-up, which kills its speed and lets the fade take over too soon. Fix: Focus on keeping the nose down throughout your pull. Imagine you’re throwing the disc into the ground 50 feet ahead. Also check your wrist — you might be flattening the angle mid-pull.
Mistake 2: The Disc Turns Into a Roller (Too Much Anhyzer)
The problem: You release on an anhyzer and the disc immediately dives right and rolls along the ground.
The fix: You’re using too steep of an anhyzer angle and/or too much power for that disc. Fix: Dial back the angle — start with a slight anhyzer (maybe 10-15 degrees) before working up to steeper angles. Also consider using a more stable disc that won’t turn over as aggressively.
Mistake 3: You Lose All Your Power
The problem: Your anhyzer shots go 50 feet shorter than your hyzer shots with the same disc.
The fix: You’re likely breaking your wrist or changing your arm angle at the last second, which kills the snap. Fix: Set the anhyzer angle in your grip and wrist before you start your pull, and keep it there. Don’t try to “add” the angle during the throw. Also check your body lean — leaning too far back can rob you of power.
Mistake 4: The Disc Stalls and Drops
The problem: The disc goes up, loses speed, and drops out of the air like a brick.
The fix: Nose-up release combined with too much height. Fix: Keep the nose down and throw on a flatter trajectory. Anhyzers don’t need to be thrown high — in fact, keeping the arc low (no more than 4-5 meters high) gives you more control.
Mistake 5: Inconsistent Angle — Sometimes Hyzer, Sometimes Anhyzer
The problem: You can’t reliably reproduce the same release angle. One throw is an anhyzer, the next is a hyzer.
The fix: Your wrist isn’t stable through the throw. Fix: Practice the “doorknob” drill — set your wrist in the anhyzer position and hold it there through a slow, controlled practice swing. Don’t let your wrist rotate or flop during the motion. Repetition builds muscle memory.
Anhyzer Shot Variations: Turnover, Flex, and Roller
Once you’ve got the basic anhyzer down, you can start shaping three distinct shot types.
The Turnover Shot
A turnover is a pure anhyzer line that never fights back. You throw an understable disc on an anhyzer angle, and it holds that right-turning line for the entire flight — no fade at the end.
When to use it: When you need the disc to finish right and stay right. Dogleg rights, approaches to pins on the right side, and shots where a leftward fade would put you in trouble.
Disc choice: Understable to very understable. Look for turn ratings of -2 or more.
The Flex Shot
A flex shot starts on an anhyzer line, turns right, and then “flexes” back to the left as the disc’s stability kicks in. The result is an S-curve that covers maximum lateral distance.
When to use it: Open fairways where you need maximum distance, or when you need to navigate around a series of obstacles where a straight line isn’t available.
Disc choice: Overstable drivers. The disc needs enough stability to fight back out of the anhyzer angle.
The Roller
A roller starts with an anhyzer release, but instead of flying in the air, the disc hits the ground on edge and rolls. Backhand rollers start with an anhyzer angle and the disc tilted so it lands on its edge.
When to use it: When you need to get under low-hanging branches, or when the ground offers a better rolling surface than the air does for distance.
Disc choice: Understable discs that will turn over quickly and hit the ground on edge. The Innova Sidewinder or Discraft Avenger SS are classic roller discs.
Key technique: Lean back slightly and pull down harder on your follow-through. The disc needs to hit the ground on its edge – too flat and it won’t roll, too steep and it’ll cut roll left.
How Wind Affects Your Anhyzer Shot
Wind is the great equalizer. A perfect anhyzer in calm conditions can turn into a disaster in a headwind. Here’s what you need to know.
Headwind
A headwind makes the disc act more understable. That means your anhyzer will turn more aggressively and earlier than usual. Adjustment: Throw a more stable disc, reduce your anhyzer angle, or both. What works in calm conditions might turn into a roller in a stiff headwind.
Tailwind
A tailwind makes the disc act more overstable. Your anhyzer won’t turn as much, and the disc will fade earlier. Adjustment: Throw a less stable disc or increase your anhyzer angle to compensate.
Crosswind (Left to Right for RHBH)
A left-to-right crosswind pushes the disc down and shortens the shot. Adjustment: Throw with more height and a slightly steeper anhyzer angle to keep the disc in the air longer.
Crosswind (Right to Left for RHBH)
A right-to-left crosswind lifts the disc and pushes it further right. Adjustment: Reduce your anhyzer angle and throw a more stable disc to prevent the disc from turning over too much.
My rule of thumb: In wind, start with a more stable disc than you think you need. You can always add more anhyzer angle, but you can’t take back a disc that’s already turned into a roller.
3 Practice Drills to Lock In Your Anhyzer
These three drills are what finally made anhyzers click for me. Do them in order.
Drill 1: The Stationary Angle Drill
Goal: Build muscle memory for the anhyzer release angle without worrying about distance.
How to do it: Stand still (no run-up). Hold your disc in the anhyzer grip and wrist position. Now do a slow, controlled practice swing — just the arm motion, no throw. Freeze at the release point and check your angle. Is the outer edge still up? Is the nose down? Repeat 20 times. Then throw 20 shots at 50% power, focusing only on the release angle.
Measure success: All 20 throws should fly on an anhyzer line, even if they only go 100 feet.
Drill 2: The Cone Drill
Goal: Shape anhyzer lines around obstacles.
How to do it: Set up two cones (or water bottles, or trees) about 50 feet apart, offset from each other so you need a right-turning line to get between them. Throw from 150 feet away, trying to curve the disc through the gap. Start with understable mids and work your way up to drivers.
Measure success: 8 out of 10 shots should make it through the gap without hitting the cones.
Drill 3: The Progressive Angle Drill
Goal: Learn to control different degrees of anhyzer.
How to do it: In an open field, set up targets at 200, 250, and 300 feet, all slightly to the right of your throwing line. Throw a stack of identical discs (same mold, same plastic) at each target with slightly different anhyzer angles. The 200-foot target gets a shallow anhyzer. The 300-foot target gets a steeper angle.
Measure success: You should be able to hit each target consistently by adjusting only your release angle — not your power or disc choice.
Frequently Asked Questions
What is an anhyzer shot in disc golf?
An anhyzer shot is a disc golf release angle where the outer edge of the disc is tilted upward and the inner edge (closest to your body) is tilted downward. For a right-handed backhand player, this causes the disc to turn right out of the hand, opposite its natural leftward fade. It’s one of the three fundamental release angles, along with hyzer and flat.
What is the difference between hyzer and anhyzer?
A hyzer has the outer edge of the disc tilted downward (away from your body), causing the disc to finish left for RHBH players. An anhyzer has the outer edge tilted upward, causing the disc to turn right. They are exact opposites. Think of hyzer as tilting the disc toward the ground and anhyzer as tilting it away from the ground.
What discs are good for anhyzer?
Understable discs with high turn ratings (-2, -3, or -4) are easiest for learning anhyzer and holding turnover lines. Good options include the Innova Leopard3, Innova Sidewinder, Discraft Buzzz, and Innova Mako3. Overstable discs are used for flex shots, where the disc turns right on anhyzer and then fights back left.
How do you throw an anhyzer flex shot?
A flex shot is thrown with an overstable disc released on an anhyzer angle. The disc turns right out of your hand, then “flexes” back to the left as its stability kicks in. The key is choosing a disc with enough fade (2, 3, or 4) to fight back out of the anhyzer line. The result is an S-curve that adds distance and lateral movement.
Why do my anhyzers keep fading out?
Early fade on an anhyzer is almost always a nose-angle problem. You’re releasing the disc nose-up, which kills its speed and lets the fade take over. Fix: Focus on keeping the nose down throughout your pull. Imagine throwing the disc into the ground 50 feet ahead. Also check that you’re holding the anhyzer angle through the entire throw — not flattening out at the last second.
Master the Anhyzer — Your Next Step
The anhyzer isn’t a trick shot. It’s a fundamental tool that every complete disc golfer needs in their bag. The difference between an 880-rated player and a 950-rated player is often just the ability to shape shots both ways — and the anhyzer is half of that equation.
Take these steps to the field. Start with putters and mids, work through the drills, and be patient with yourself. I spent a full season grinding anhyzers before they clicked, but once they did, I started saving at least 2-3 strokes per round on courses I’d been struggling with for years.
Now get out there and throw some annies. And when you do, remember — the disc goes where the angle tells it to go. You’re just the one setting the angle.
For more disc golf technique guides, check out our complete disc golf instruction archive.